【JS】画像のリアルタイム物体検出 数行で実装 デモ有 TensorFlow.js coco-ssd
2018-12-1816 min read
目次
概要
TensorFlow.js+coco-ssdを用いて、1枚の画像から複数のオブジェクト検出を行う方法を紹介します。 デモも作ったので興味があれば触ってみてください。
オブジェクト検出
オブジェクト検出にはTensorFlow.js + coco-ssdを利用しました。
https://www.npmjs.com/package/@tensorflow-models/coco-ssd
試す
いくつかの画像で試してみました。
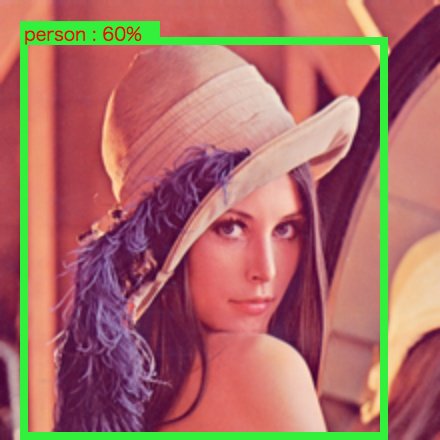 例の画像。60%となっていますが、人間として認識してました。
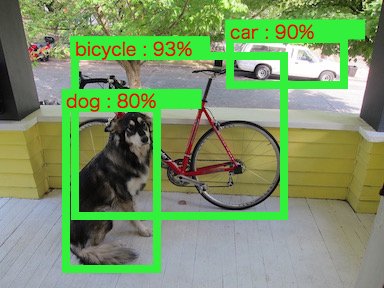 犬と自転車の画像。YOLOとかのサンプルで見かける写真ですが、こんな感じに検出しました。
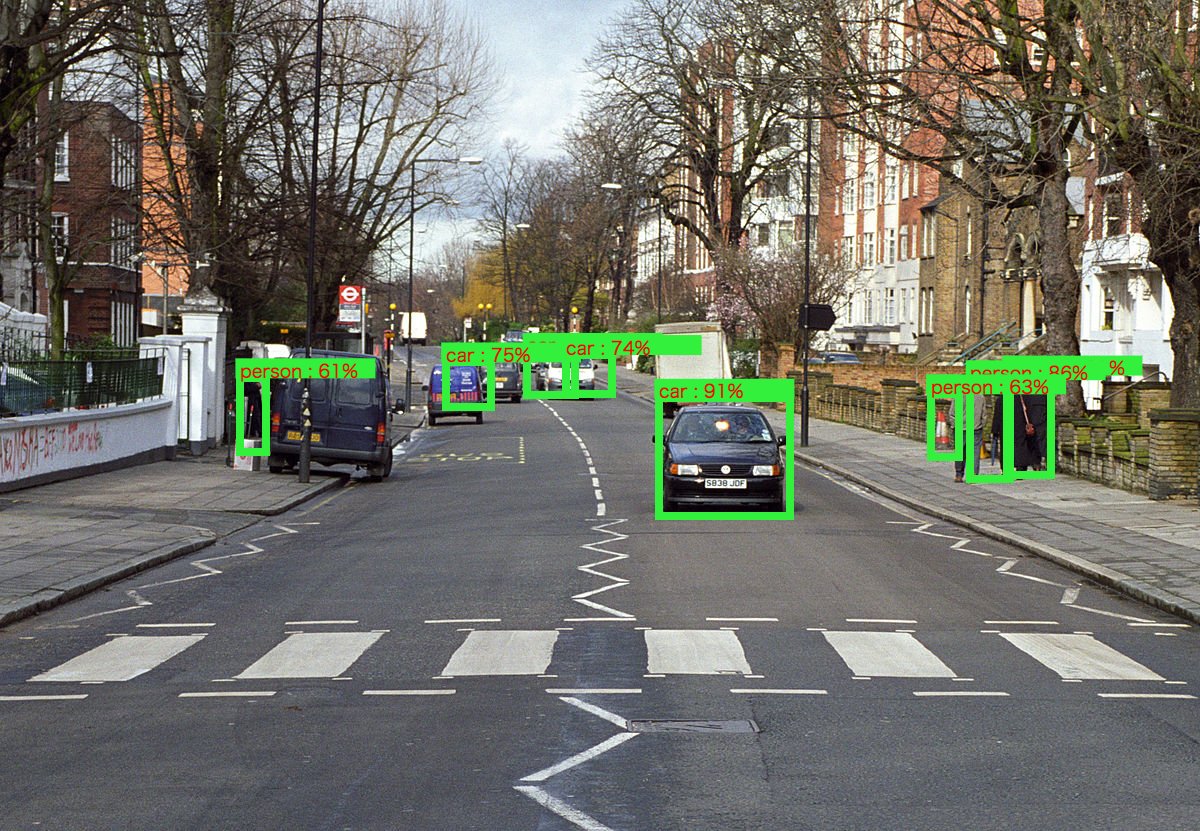 アビーロード。
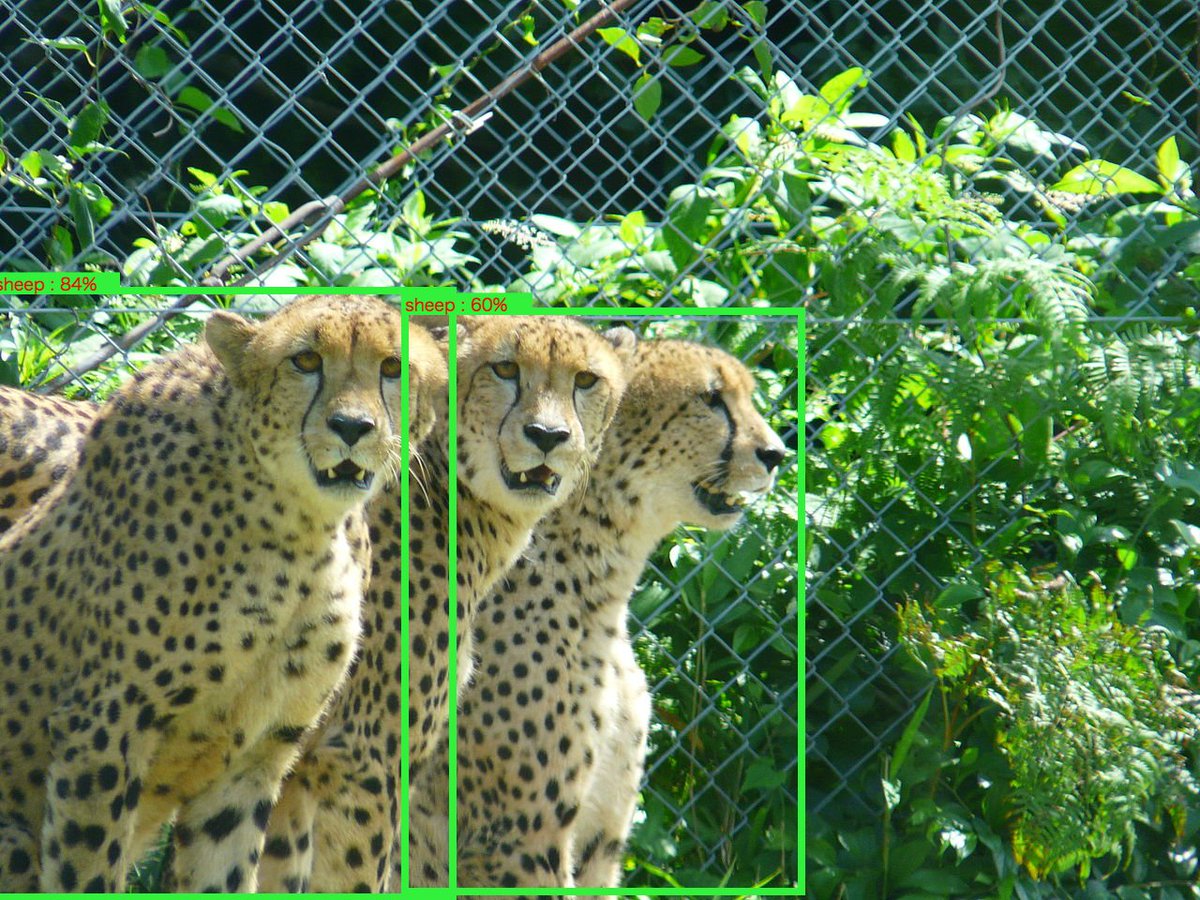 羊として認識されています。
サンプルコードと解説
scriptタグで始める
単純にscriptタグで始めるのであれば、以下のコードで始めることができます。
<script src="https://cdn.jsdelivr.net/npm/@tensorflow/tfjs"> </script>
<script src="https://cdn.jsdelivr.net/npm/@tensorflow-models/coco-ssd"> </script>

<img id="img" src="test.jpg">

<script>
    cocoSsd.load().then(model => {
        model.detect(img).then(predictions => {
            console.log('Predictions: ', predictions);
        });
    });
</script>
coco-ssd API
cocoSsd.load();このメソッドでモデルをロードします。引数を渡さない場合は”lite_mobilenet_v2”が選択されます。
model.detect();model.detect()で物体検出を行います。引数にはhtmlのimg要素canvas要素、ImageDataオブジェクトを渡すことができます。 物体の検出に成功した場合は次のJSONのような形で値が渡されます。 失敗した場合はからの配列が渡ってきます。この値は人を検出した時の例です。
[
  {
    "bbox": [
      225.4661464691162,
      21.420029640197754,
      194.02139472961426,
      326.7346258163452
    ],
    "class": "person",
    "score": 0.802341103553772
  }
]
デモ
https://jsfiddle.net/s_yoshiki/tn7usb9p/show
デモのサンプルコード
このサンプルソースではcanvasを利用していますが、img要素などに置き換えることもできます。
<input type="file" id="file">

<canvas id="canvas"></canvas>

<pre id="debug">
ラベルとかの処理はcanvasのAPIを叩いて実装しています。
const canvas = document.getElementById('canvas');

document.getElementById('file').onchange = function() {
  let img = this.files[0];
  let reader = new FileReader();
  reader.readAsDataURL(img);
  reader.onload = function() {
    detectObjects(reader.result);
  };
};

function detectObjects(url) {
  let ctx = canvas.getContext('2d');
  let image = new Image();
  let debug_dom = document.getElementById('debug');
  image.src = url;

  image.onload = () => {
    canvas.width = image.width;
    canvas.height = image.height;

    ctx.drawImage(image, 0, 0);
    cocoSsd.load().then(model => {
      model.detect(canvas).then(predictions => {
        for (var i = 0; i < predictions.length; i++) {
          var obj = predictions[i];
          var box = obj.bbox;
          console.log(i);
          drawRect(box[0], box[1], box[2], box[3]);
          drawLabel(
            obj['class']
              + ' : '
              + parseInt(obj['score'] * 100, 10)
              + '%',
            box[0],
            box[1],
          );
        }
        debug_dom.innerHTML = JSON.stringify(predictions, null, '\t');
      });
    });
  };
}

function drawRect(x, y, w, h) {
  var ctx = canvas.getContext('2d');
  ctx.beginPath();
  ctx.rect(
    parseInt(x, 10),
    parseInt(y, 10),
    parseInt(w, 10),
    parseInt(h, 10),
  );
  ctx.strokeStyle = 'rgb(50, 240, 60)';
  ctx.lineWidth = 8;
  ctx.stroke();
  ctx.closePath();
}

function drawLabel(text, x, y) {
  var ctx = canvas.getContext('2d');

  ctx.beginPath();
  ctx.rect(x - 5, y - 20, 140, 20);
  ctx.fillStyle = 'rgb(50, 240, 60)';
  ctx.fill();
  ctx.closePath();

  ctx.beginPath();
  ctx.font = '18px \'MS Pゴシック\'';
  ctx.fillStyle = 'red';
  ctx.fillText(text, parseInt(x, 10), parseInt(y, 10));
  ctx.closePath();
}
参考
https://www.npmjs.com/package/@tensorflow-models/coco-ssd
https://hackernoon.com/tensorflow-js-real-time-object-detection-in-10-lines-of-code-baf15dfb95b2
Recommends

New Posts
Hot posts!
Date
Author
ただの備忘録です。