
顔のランドマーク検出とドロネー分割 Python + OpenCV + dlib
2018-11-1715 min read
目次
概要
Python + OpenCV + dlib を用いて顔にドロネー図を描画するサンプルを紹介します。
おまけで、カメラから取得した顔画像に描画するサンプルを追加しました。
環境
Python 3.7.0 OpenCV 3.4
デモ
サンプルソース
import cv2
import dlib
import numpy as np

PREDICTOR_PATH = "/path/to/shape_predictor_68_face_landmarks.dat"
predictor = dlib.shape_predictor(PREDICTOR_PATH)

cascade_path='/path/to/haarcascade_frontalface_default.xml'
cascade = cv2.CascadeClassifier(cascade_path)

def get_landmarks(im):
    rects = cascade.detectMultiScale(im, 1.3,5)
    (x,y,w,h) = rects[0]
    rect = dlib.rectangle(x,y,x+w,y+h)
    return np.matrix([[p.x, p.y] for p in predictor(im, rect).parts()])

def annotate_landmarks(im, landmarks):
    im = im.copy()
    for idx, point in enumerate(landmarks):
        pos = (point[0, 0], point[0, 1])
        cv2.putText(im, str(idx), pos,
            fontFace=cv2.FONT_HERSHEY_SCRIPT_SIMPLEX,
            fontScale=0.4,
            color=(255, 0, 0))
        cv2.circle(im, pos, 2, color=(255, 255, 0))
    return im

def rect_contains(rect, point) :
    if point[0] < rect[0] :
        return False
    elif point[1] < rect[1] :
        return False
    elif point[0] > rect[2] :
        return False
    elif point[1] > rect[3] :
        return False
    return True

def draw_delaunay(img, subdiv, delaunay_color ) :

    triangleList = subdiv.getTriangleList()
    size = img.shape
    r = (0, 0, size[1], size[0])

    for t in triangleList :

        pt1 = (t[0], t[1])
        pt2 = (t[2], t[3])
        pt3 = (t[4], t[5])

        if rect_contains(r, pt1) and rect_contains(r, pt2) and rect_contains(r, pt3) :

            cv2.line(img, pt1, pt2, delaunay_color, 1, 16, 0)
            cv2.line(img, pt2, pt3, delaunay_color, 1, 16, 0)
            cv2.line(img, pt3, pt1, delaunay_color, 1, 16, 0)

if __name__ == "__main__" :
    im = cv2.imread('lenna.png')

    height = im.shape[0]
    width = im.shape[1]

    im = cv2.resize(im, (width, height))

    rect = (0, 0, width, height)

    subdiv = cv2.Subdiv2D(rect)

    points = get_landmarks(im)

    for p in points :
        a = np.array(p).ravel()
        subdiv.insert((a[0], a[1]))

    draw_delaunay(im, subdiv, (255, 255, 255) )

    # im = annotate_landmarks(im, points)

    cv2.imshow('result', im)

    cv2.waitKey(0)
    cv2.destroyAllWindows()
実行結果
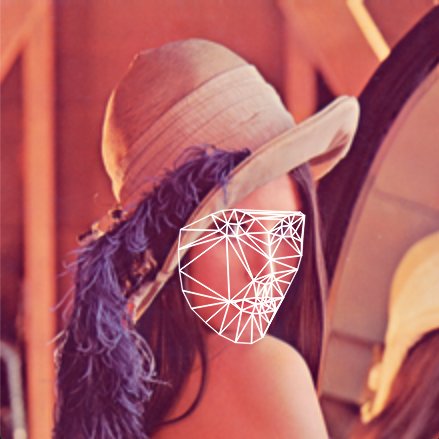
リアルタイムでカメラ画像を利用する場合
この場合は、メイン部分をいかに書き換えます。
if __name__ == "__main__" :
    cap = cv2.VideoCapture(0)

    while(True):
        try:
            ret, im = cap.read()

            height = im.shape[0]
            width = im.shape[1]
            im = cv2.resize(im, (width, height))

            rect = (0, 0, width, height)

            subdiv = cv2.Subdiv2D(rect)

            points = get_landmarks(im)

            for p in points :
                a = np.array(p).ravel()
                subdiv.insert((a[0], a[1]))

            draw_delaunay( im, subdiv, (255, 255, 255) )

            # im = annotate_landmarks(im, points)

            cv2.imshow('Result',im)

        except:
            print('error!')

        if cv2.waitKey(0) & 0xFF == ord('q'):
            break

    cv2.destroyAllWindows()
説明
ざっくりと、
顔検出 → パーツ検出 → ドロネー分割 → 描画
というフローになっています。
dlib
「dlib」と呼ばれるオープンソースの機械学習ライブラリで顔の輪郭および各器官の検出を行います。
https://tech-blog.s-yoshiki.com/2018/10/702/
Subdiv2D
ドロネー三角形の分割の計算にはOpenCVのSubdiv2Dクラスを利用します。
https://tech-blog.s-yoshiki.com/2018/11/734/
参考
Recommends
New Posts
Hot posts!
Date
Author











![[Unicode]スペース以外の見えない空白文字の一覧](/images/thumbnail/linux-logo.png)










 (24)
(24) (16)
(16) (15)
(15) (14)
(14) (12)
(12) (11)
(11) (10)
(10) (10)
(10) (10)
(10) (10)
(10) (10)
(10) (9)
(9) (8)
(8) (8)
(8) (7)
(7) (6)
(6) (6)
(6) (6)
(6) (6)
(6) (5)
(5) (5)
(5) (5)
(5) (5)
(5)

