Vue/Nuxt.js 触ってた人が Next.js に入門する
目次
- 概要
- はじめに
- create-a-nextjs-app
- navigate-between-pages
- assets-metadata-and-css
- プリレンダリング
- 動的ルート
- apiルーティング
- デプロイ
- 参考にしたサイト
概要
React / Next.jsに入門しました。一番最初のHelloWorldから、簡単なアプリケーションを作成するところまでを記録しました。
はじめに
今まで Vue Nuxt.js を利用したことはありましたが、React や Next.js は利用したことがありませんでした。
Vueは学習して行く上でつまづく部分が少なく、データバインディング(Vueのmodel)も扱いやすかったです。
しかしながら、「VueよりもReact」論が多く見られたため、Next.js を触ってみることにしました。(React要素は省略)
実施環境
$ node --version
v15.5.0
$ npm --version
7.3.0
学習ガイド
Next.js Learn (Basic) https://nextjs.org/learn/basics/create-nextjs-app に沿って学習していきたいと思います。
Create a Next.js App
まずは Hello World を実施します。 https://github.com/vercel/next-learn-starter はNext.jsのスターターテンプレートとなっています。 これを利用します。
npx create-next-app nextjs-blog --use-npm --example "https://github.com/vercel/next-learn-starter/tree/master/learn-starter"
cd nextjs-blog
npm run dev
http://localhost:3000/ を開きます。"Welcome to Next.js!" と表示されます。
Navigate Between Pages
セットアップ
npx create-next-app nextjs-blog --use-npm --example "https://github.com/vercel/next-learn-starter/tree/master/navigate-between-pages-starter"
cd nextjs-blog
ページの作成
pages/posts/first-post.js
export default function FirstPost() {
  return <h1>First Post</h1>;
}
http://localhost:3000/posts/first-post にアクセス
pagesディレクトリはルーティングも兼ねている。 ファイル名がパスとなる。
pages/posts/first-post.js # http://localhost:3000/posts/first-post
pages/index.js # http://localhost:3000/
リンク
<Link href="/"></Link> でリンクを実装する。aタグは利用しない。
例
pages/index.js
import Link from 'next/link';

export default function() {
  return (
    <Link href='/posts/first-post'>
      <a>this page!</a>
    </Link>
  );
}
Assets, Metadata, and CSS
セットアップ
npx create-next-app nextjs-blog --use-npm --example "https://github.com/vercel/next-learn-starter/tree/master/assets-metadata-css-starter"
cd nextjs-blog
Assets
画像などのアセットは public/に配置する。robots.txtなどもここに配置する。
メタデータ
Headタグを利用する
例
import Head from 'next/head';<Head>
<title>Create Next App</title>
<link rel="icon" href="/favicon.ico" />
</Head>CSSスタイリング
styled-jsxを利用してCSS-in-JSを実現する例。
<style jsx>{`
  …
`}</style>
レイアウトコンポーネント
前提としてコンポーネントはcomponentsディレクトリに配置する
components/layout.js
export default function Layout({ children }) {
  return <div>{children}</div>;
}
コンポーネントを利用する場合。
pages/posts/first-post.js
import Head from 'next/head';
import Link from 'next/link';
import Layout from '../../components/layout';

export default function FirstPost() {
  return (
    <Layout>
      <Head>
        <title>First Post</title>
      </Head>
      <h1>First Post</h1>
      <h2>
        <Link href='/'>
          <a>Back to home</a>
        </Link>
      </h2>
    </Layout>
  );
}
cssモジュールを作成する場合は
components/layout.module.css
.container {
  max-width: 36rem;
  padding: 0 1rem;
  margin: 3rem auto 6rem;
}
components/layout.js
import styles from './layout.module.css';

export default function Layout({ children }) {
  return <div className={styles.container}>{children}</div>;
}
グローバルスタイル
styles/global.css
html,
body {
  padding: 0;
  margin: 0;
  font-family: -apple-system, BlinkMacSystemFont, Segoe UI, Roboto, Oxygen, Ubuntu,
    Cantarell, Fira Sans, Droid Sans, Helvetica Neue, sans-serif;
  line-height: 1.6;
  font-size: 18px;
}
/* 省略 */
pages/_app.js
import '../styles/global.css';

export default function App({ Component, pageProps }) {
  return <Component {...pageProps} />;
}
プリレンダリング
※プリレンダリングの方式についてはこちらで解説しています。
セットアップ
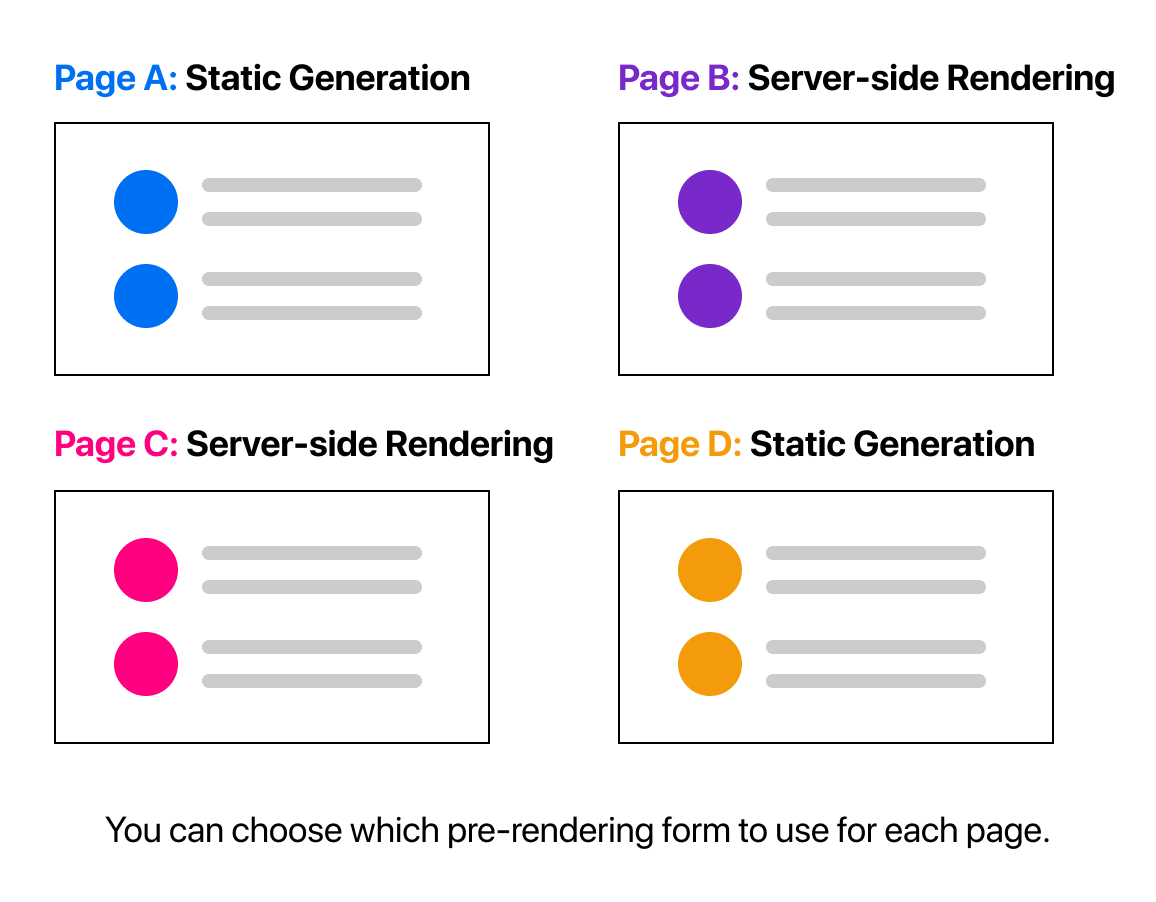
npx create-next-app nextjs-blog --use-npm --example "https://github.com/vercel/next-learn-starter/tree/master/data-fetching-starter"プリレンダリングの2つの方式
- Static Generation (SSG): ビルド時にHTMLを生成する事前レンダリング方法
- Server Side Rendering (SSR): クエストごとにHTMLを生成する事前レンダリングする方法
その他にも、Client Side Rendering(CSR)やIncremental Static Regeneration(ISR)が存在します。
https://my-chakra-app-chi.vercel.app/にて、 実際の挙動を確認できます。
その他特徴
- ページごとレンダリング方式を選択できる

SSGとSSRの使い分け
可能な限りSSGを利用すべき。
SSGの使い道は次のようなもの。
- マーケティングページ
- ブログ
- Eコマース製品リスト
- ヘルプ&ドキュメント
頻繁に更新されるデータを利用する際にはSSRを利用する。
データがある場合とない場合の静的生成
SSGにおいて getStaticProps を利用すると ビルド時にデータ取得を行い初期データの表示を行う。
export default function Home(props) { ... }

export async function getStaticProps() {
  // Get external data from the file system, API, DB, etc.
  const data = ...

  // The value of the `props` key will be
  //  passed to the `Home` component
  return {
    props: ...
  }
}
SSRでは getServerSidePropsを利用する。
export async function getServerSideProps(context) {
  return {
    props: {
      // props for your component
    },
  };
}クライアントサイドからデータをフェッチする際にはSWRを利用すべきである。 SEOが関係しないプライベートなユーザー固有のページではクライアントサイドでのレンダリングが向いている。
import useSWR from 'swr';
function Profile() {
  const { data, error } = useSWR('/api/user', fetcher);
  if (error) return <div>failed to load</div>;
  if (!data) return <div>loading...</div>;
  return <div>hello {data.name}!</div>;
}
動的ルート
セットアップ
npx create-next-app nextjs-blog --use-npm --example "https://github.com/vercel/next-learn-starter/tree/master/dynamic-routes-starter"ダイナミックルート
/user/taro /user/jiro のようなルーティングを単一のファイルで処理する
ファイル名は [id].js のような書式にする。
例(SSGの場合)
pages/posts/[id].js
import Layout from '../../components/layout'

export default function Post() {
  return <Layout>...</Layout>
}

// getStaticPaths はSSG用APIであり、ダイナミックルート使用時に静的ファイルを生成するためのもの。
export async function getStaticPaths() {
  // fallbackは事前ビルドしたパス以外にアクセスしたときの動作を決めるもの
  return {
    [
      '/path/1',
      '/path/2',
      '/path/3',
    ],
    fallback: false
  }
}

export async function getStaticProps({ params }) {
  // Fetch necessary data for the blog post using params.id
}
この例では
getStaticPaths を使用してすべての可能なブログ投稿をフェッチし getStaticPropsを使用してIDを指定して特定の投稿をフェッチします。
APIルーティング
nextでAPIサーバを立てることも可能。
セットアップ
npx create-next-app nextjs-blog --use-npm --example "https://github.com/vercel/next-learn-starter/tree/master/api-routes-starter"シンプルなAPI
pages/api/hello.js
export default function handler(req, res) {
  res.status(200).json({ text: 'Hello' });
}
http://localhost:3000/api/hello にアクセスすると次のようなレスポンスとなる。
{ "text": "Hello" }デプロイ
vercelが良いらしい。
参考にしたサイト
Next.js Learn (Basic) を試して学んだ Next.js の基礎の基礎 - kakakakakku blog https://kakakakakku.hatenablog.com/entry/2020/02/07/113525
Next.jsにおけるSSG(静的サイト生成)とISRについて(自分の)限界まで丁寧に説明する - Qiita https://qiita.com/thesugar/items/47ec3d243d00ddd0b4ed


![[Unicode]スペース以外の見えない空白文字の一覧](/images/thumbnail/linux-logo.png)


 (29)
(29) (24)
(24) (19)
(19) (16)
(16) (15)
(15) (14)
(14) (12)
(12) (12)
(12) (11)
(11) (10)
(10) (10)
(10) (10)
(10) (10)
(10) (10)
(10) (9)
(9) (8)
(8) (8)
(8) (8)
(8) (7)
(7) (6)
(6) (6)
(6) (6)
(6) (6)
(6) (5)
(5) (5)
(5) (5)
(5) (5)
(5)

