OpenCVをEmscriptenでwasmにビルドする!Webブラウザから呼び出す。OpenCV.js
目次
概要
OpenCVをLLVM→EmscriptenでWebAssembly(以下、wasm)をビルドする。\n JavaScriptからOpenCVを呼び出す。
環境 使用するもの
OpenCV4.0.0(pre)
https://github.com/opencv/opencv
Emscripten
https://kripken.github.io/emscripten-site/index.html
LLVM
OpenCV.jsの紹介
About
OpenCV.jsに関する詳細は公式でも詳しく書かれています。
https://docs.opencv.org/3.3.1/df/d0a/tutorial_js_intro.html
Introduction to OpenCV.js and Tutorials - 公式
LLVMとEmscripten
公式から引用。Emscripten is an LLVM-to-JavaScript compiler. It takes LLVM bitcode - which can be generated from C/C++ using clang, and compiles that into asm.js or WebAssembly that can execute directly inside the web browsers. . Asm.js is a highly optimizable, low-level subset of JavaScript. Asm.js enables ahead-of-time compilation and optimization in JavaScript engine that provide near-to-native execution speed. WebAssembly is a new portable, size- and load-time-efficient binary format suitable for compilation to the web. WebAssembly aims to execute at native speed. WebAssembly is currently being designed as an open standard by W3C.
Introduction to OpenCV.js and Tutorials\n OpenCV.js: OpenCV for the JavaScript programmer\n https://docs.opencv.org/3.3.1/df/d0a/tutorial_js_intro.html
Emscriptenとは、任意のプログラミング言語に対してのコンパイラ基盤である「LLVM」から「JavaScript」へのコンパイラです。LLVMを用いて、C/C++から生成されるLLVMコードをWebブラウザから直接実行できるasm.jsまたはWasmにコンパイルします。
チュートリアル
OpenCV introduces a new set of tutorials that will guide you through various functions available in OpenCV.js. This guide is mainly focused on OpenCV 3.x version.OpenCV.jsはブラウザ内で直接実行できます。\n 例えば、WebRTCとOpenCVを組み合わせたアプリケーションを、リアルタイムで結果を見ながら実装することができるようなメリットがあるようです。The purpose of OpenCV.js tutorials is to:
- Help with adaptability of OpenCV in web development\n
- Help the web community, developers and computer vision researchers to interactively access a variety of web-based OpenCV examples to help them understand specific vision algorithms.
Because OpenCV.js is able to run directly inside browser, the OpenCV.js tutorial web pages are intuitive and interactive. For example, using WebRTC API and evaluating JavaScript code would allow developers to change the parameters of CV functions and do live CV coding on web pages to see the results in real time.
Prior knowledge of JavaScript and web application development is recommended to understand this guide.
Introduction to OpenCV.js and Tutorials\n OpenCV.js Tutorials\n https://docs.opencv.org/3.3.1/df/d0a/tutorial_js_intro.html
OpenCV.jsのビルド
ここではOpenCV.jsのビルド方法について紹介します。
環境のセットアップ
nodejs,python,cmakeがなどが必要となります。
# Install Python
sudo apt install python2.7

# Install node.js
sudo apt install nodejs

# Install CMake
sudo apt install cmake
Emscripten
任意のディレクトリに移動しgitからcloneします。
git clone https://github.com/juj/emsdk.git
cd emsdk
emsdkコマンドを利用して最新のツールをインストールします。\n 完了したら、パスを通します。
git pull
./emsdk install latest
./emsdk activate latest
source ./emsdk_env.sh
実行結果がこちら。
# result
Adding directories to PATH:
PATH += /path/to/emsdk
PATH += /path/to/emsdk/clang/e1.38.12_64bit
PATH += /path/to/emsdk/node/8.9.1_64bit/bin
PATH += /path/to/emsdk/emscripten/1.38.12

Setting environment variables:
EMSDK = /path/to/emsdk
EM_CONFIG = /Users/username/.emscripten
LLVM_ROOT = /path/to/emsdk/clang/e1.38.12_64bit
EMSCRIPTEN_NATIVE_OPTIMIZER = /path/to/emsdk/clang/e1.38.12_64bit/optimizer
BINARYEN_ROOT = /path/to/emsdk/clang/e1.38.12_64bit/binaryen
EMSDK_NODE = /path/to/emsdk/node/8.9.1_64bit/bin/node
EMSCRIPTEN = /path/to/emsdk/emscripten/1.38.12
これで完了です。\n パスを通すことでshell変数にパスが格納されます。
echo ${EMSCRIPTEN}
# /path/to/emsdk/emscripten/1.38.12
OpenCVの準備
gitでopencvをcloneします。
git clone https://github.com/opencv/opencv.git
クローンが完了したらpythonからビルドスクリプトを実行します。
公式では詳しく書かれていませんでしたが、\n 自分の環境ではPython3系で実行すると転びました。なので2.7で実行しました。
cd opencv/platforms/js/
ls ./
# README.md   build_js.py
build_jsディレクトリを構築する場合
python ./build_js.py build_js
上記のコマンドは、デフォルトでasm.jsをビルドします。\n wasmバージョンを作成するには、--build_wasmオプションを追加します。
python ./build_wasm --build_wasm
そのほかにも --build_doc や --build_testオプションなどが存在します。
python ./build_js.py build_js
正しくインストールされれば以下のようにファイルが生成されています。
ls build_wasm/bin
# opencv.js      opencv_js.js   opencv_js.wasm
テスト
上にも書いたように、--build_testオプションでテストを行うことができます。
build_js.py build_js --build_test
cd bin
npm install
node test.js
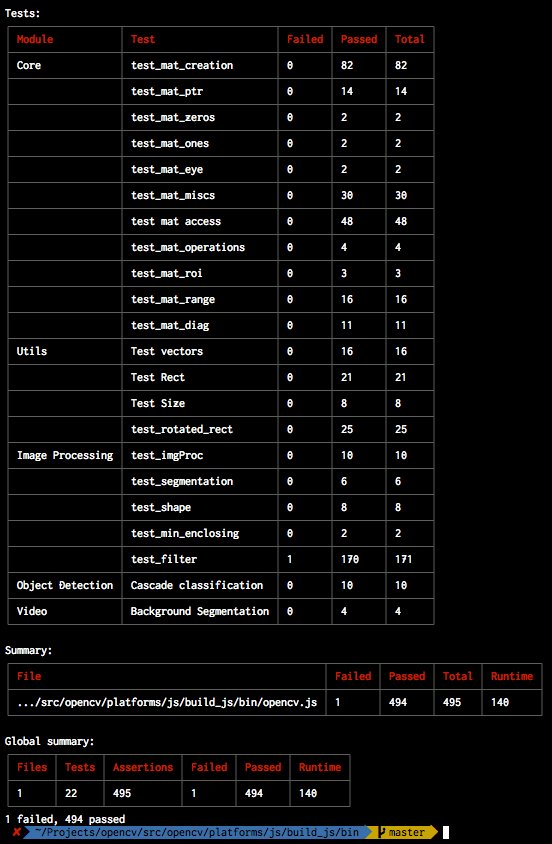
nodejsでコマンドラインからテストの結果を確認。
ブラウザからテスト結果を確認\n http://localhost:8080/tests.htmlでサーバをスタート
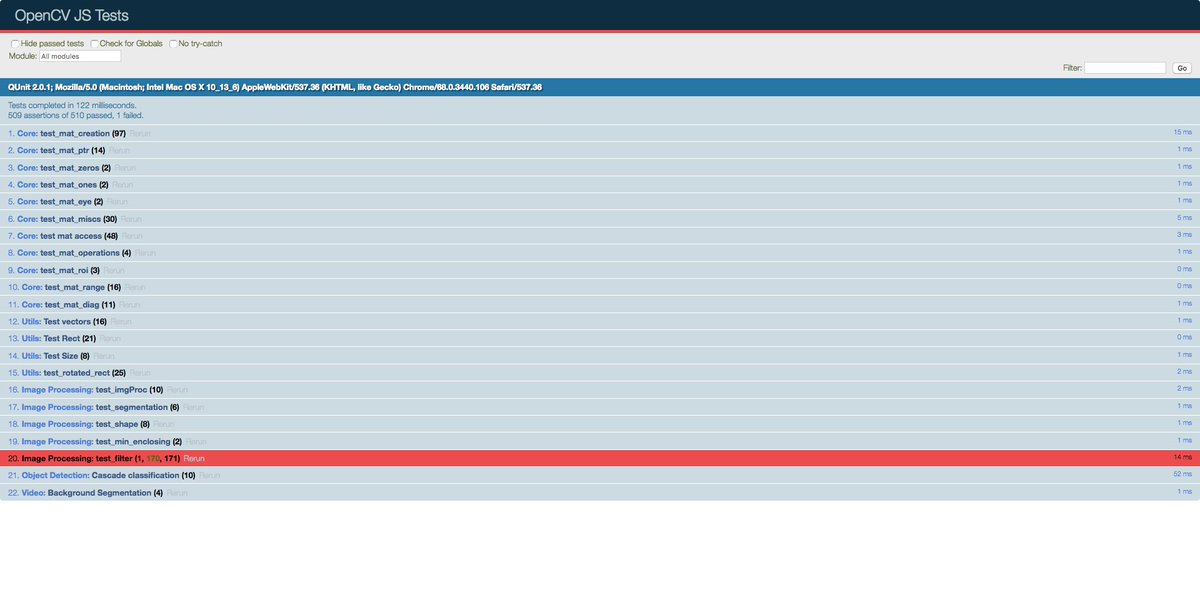
こんな形でビルド結果を確認することができます。\n 1件エラーがあるのが気になりますね。
終わりに
近いうちにJSでの実装に関する記事を書きたいと思います。\n 以上、よろしく